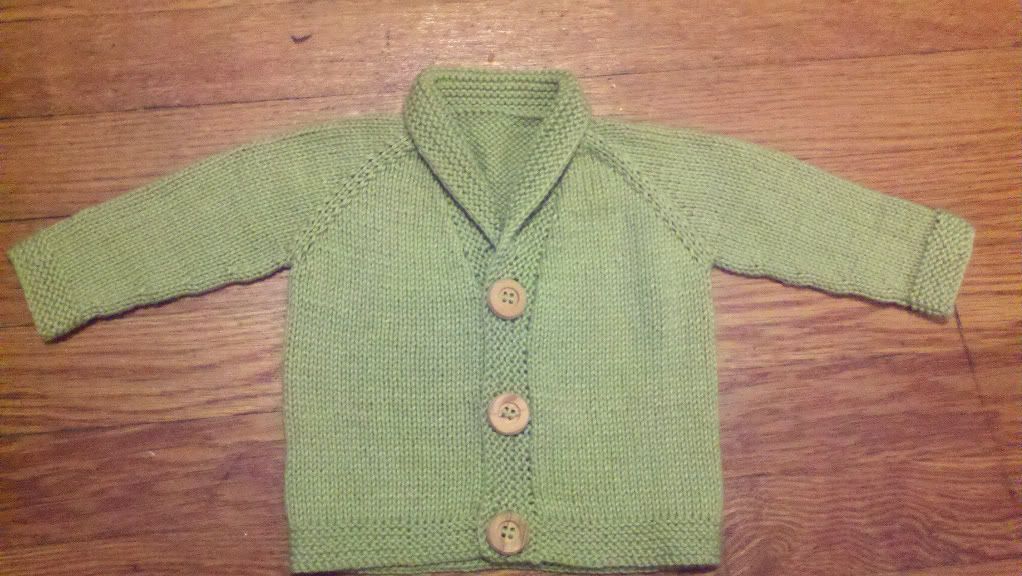
Available on my Ravelry, but I'll post it here too. The sweater is my take on "Baby Sophisticate" by Linden Down, using a sport weight yarn and much smaller needles (Sizes 2 and 4 - hat and socks use the same sizes as well). The hat and socks I could not find a pattern for. I guess for some reason when someone thinks baby items they also think gaudy, bulky and full of design. So these are a bit more simple, the socks are made from the toe up. I do not like the gusset look, so I made them to look like a pair of regular socks, though sport weight is a bit heavy for socks to begin with.

Pattern for the Sweater, Hat and Socks as follows:
Baby Sophisticate sweater
YOKE:
With larger needles, CO 40 sts
Row 1: k3, PM, k5, PM, k24, PM, k5, PM, k3
Row 2 (and all WS rows): p all sts
Row 3 (and every 4th RS row): k1, m1l, *k to 1 st before marker, inc 1, k1, sl m, k1, inc 1, rep from * to last st, m1r, k1
Row 5 (and all non 4th RS rows): *k to 1 st before marker, inc 1, k1,slip m, k1, inc 1, repeat from * to end
Continue raglan shaping, ending on a WS row - 32 rows have been worked, piece measures 4" from neck edge - 176 sts
Split Sleeves:
Row 33: (RS) k to m, place next 35 sts on holder, k to next m, place next 35 sts on holder, k to end - 106 sts for body
Row 34: purl
Continue in ST st, slipping first st of each row, until piece measures 5.5" from underarm, ending with a RS row - 39 rows from underarm
Change to smaller needles- Next 10 rows: (starting on a WS row) knit across. BO sts.
SLEEVES:
With larger needles, pick up and knit 35 sleeve sts, join for round, working 8 rounds in ST st
Dec Rnd: k1, k2tog, k to last 3 sts, ssk, k1
Work 7 rnds in ST st
Rep last 8 rnds twice more
Rep dec rnd once more - 27 sts rem
Work 3 rnds in ST st
Switch to smaller needles and work Garter st for 10 rnds, starting with a purled row. BO sts
Collar and button band:
With RS facing, PU and knit 53 sts along right front, 38 sts along tops of sleeve and back neck, 53 along left front - 144 sts
Knit 4 rows, placing two markers on each front 32 sts up from edges
Next row: k2, (BO4, k8) twice, BO4, Knit to 1 st before second m, w&t on st before m
Next row: Knit to 1 st before next m, w&t on st before m
Next row: Knit to 4 sts before last w&t, w&t next st
Rep last row 3 times more (you will have wrapped and turned 3 times on each side of the collar)Next row: Knit to wrapped st, working wrap together with st, knit next st and turn
Next row: sl first st, knit to next wrap and knit, working wrap together with st, knit next st and turn
Rep last row 3 times more
Next row: Knit to last wrap, working wrap together with st *Do not turn*, (CO4, k9) twice, CO4, k2
Knit 4 more rows in garter st
BO sts
Note: there will be 2 extra rows on the left front button band than on the right due to the short row shaping. For a boys sweater this is not a problem since it closes left over right. For a girls sweater start the short row shaping on a RS row (Knit 3 rows in the beginning instead of 4).
HAT:
CO 80 sts, join for round
With smaller needles, work 8 rows in 2x2 ribknit
Switch to larger needles and work 20 rows in ST st
Shaping:
Rnd 29: (k8, k2tog) across
30 and all even numbered rnds: knit
31: (k7, k2tog) across
33: (k6, k2tog) across
35: (k5, k2tog) across
37: (k4, k2tog) across
39: (k3, k2tog) across
40: (k2, k2tog) across
41: (k1, k2tog) across
43 & 45: (k2tog) across - pull yarn through rem 4 sts and secure
Pompom optional but it's made on a circle 1.75" in diameter
Finished measurements:
Circumference: 13"
Length: 5.5"
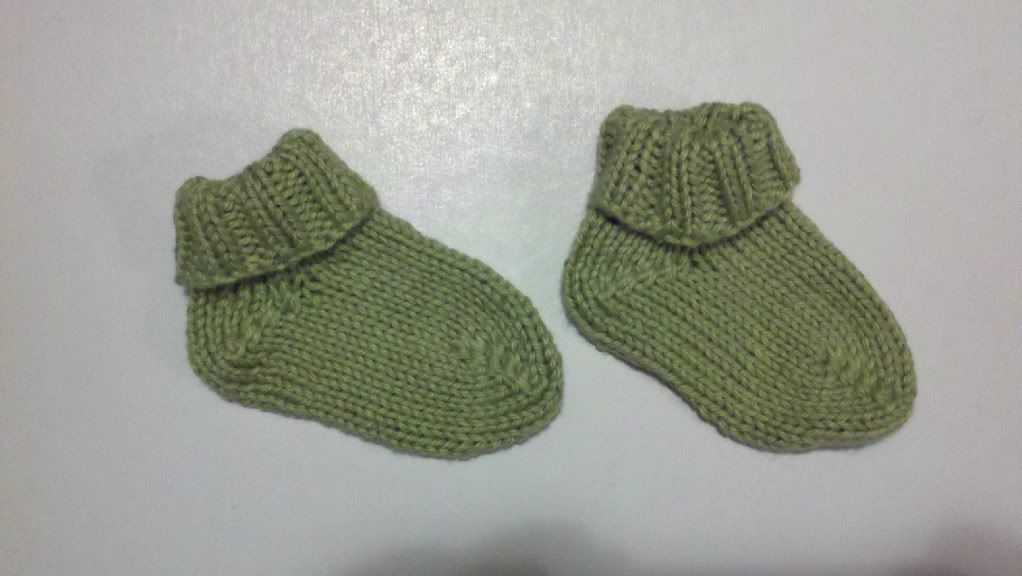
SOCKS:
(Made with shortrow shaping at toe and heel)
Using crochet cast-on, CO 14 sts
Row 1 [WS]: P all sts.
Row 2 [RS]: K to last st, W&T.
Row 3 [WS]: P to last st, W&T.
Row 4 [RS]: K to st before last wrapped st, W&T.
Row 5 [WS]: P to st before last wrapped st, W&T.
Repeat Rows 4 and 5 until 4 sts remain unwrapped between wrapped sts on either side of work. You will be ready to start a RS row.
Row 6 [RS]: K to first wrapped st, k wrapped st, W&T.
Row 7 [WS]: Sl 1, p to first wrapped st, p wrapped st, W&T.
Row 8 [RS]: Sl 1, k to first double-wrapped st, k double-wrapped st, W&T.
Row 9 [WS]: Sl 1, p to first double-wrapped st, p double-wrapped st, W&T.
Repeat Rows 8 and 9 until one double-wrapped stitch remains at each end of work.
Row 10 [RS]: Sl 1, k to double-wrapped st, k double-wrapped st. Do not turn work.* (Work wraps of remaining double-wrapped st together with st when working first round of foot.)Carefully remove crochet chain from CO edge of work, and place the 14 live sts on two double-point needles, or one circular needle. There should now be 28 sts on the needles.
Work 13 rounds in ST st, then repeat short row shaping as indicated above, for the heel.
Ankle: Work 2 rounds in ST st
Cuff: switch to smaller needles and work 16 rounds in 2x2 ribknit. BO sts loosely
Finished measurements:
Foot length: 3.75"
Total length: 6.75"
Circumference at cuff: 5" slightly stretched - At foot: 4"
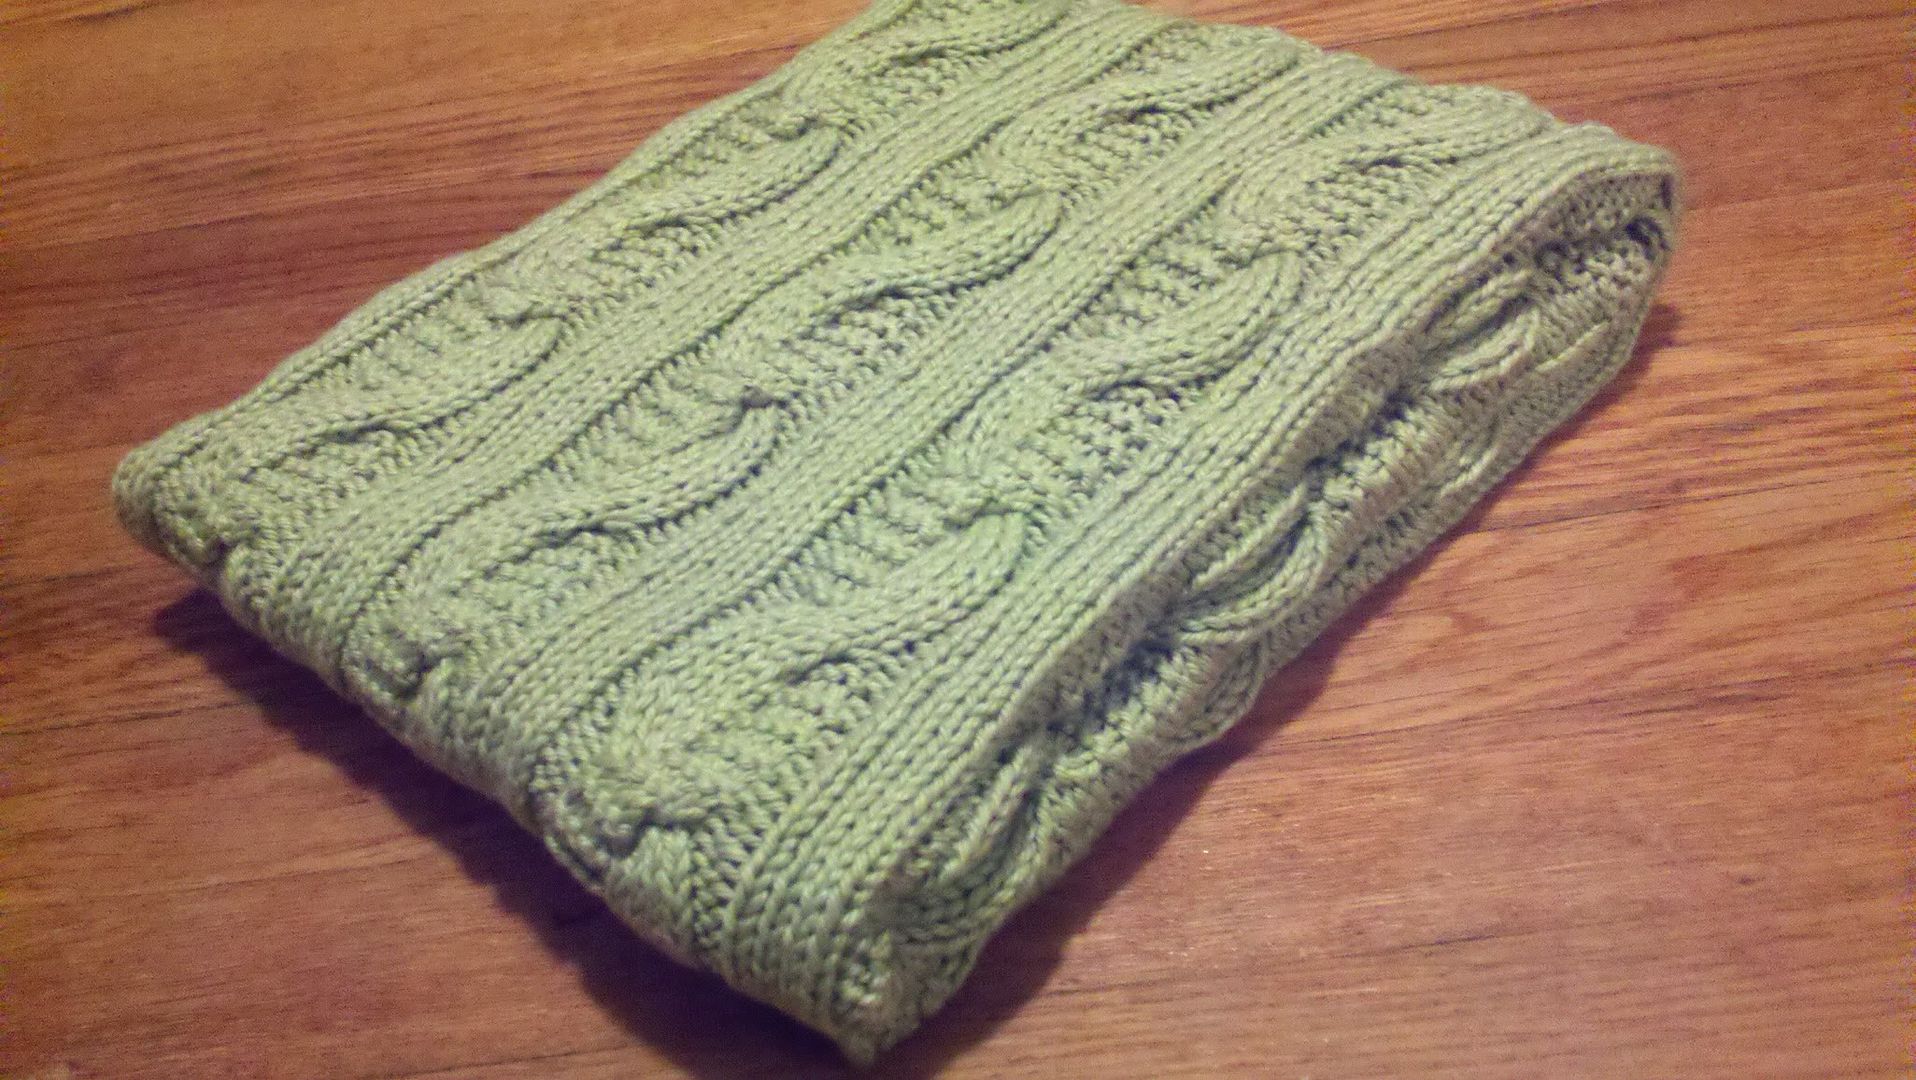
The blanket is "Cable Blanket" by Debbie Bliss, published in Simply Baby. I cast on for 9 cable repeats, a total of 156 stitches. It's an 8-stitch wide cable, repeated every 12 rows (if I'm remembering correctly. The edges of garter stitch as well as the ribknit panels are 4 stitches wide, and there are 2 purl stitches on either edge of each cable. - At least that was my interpretation of it. I couldn't get ahold of the book or pattern, so it may be a little different than that.