One of the reasons I buy Freya is not just for their somewhat extended size range and the availability of a t-shirt bra that fits a natural tall, wide root in a 28. It's also for their somewhat better quality. I'm not going to find the same type of durability or size that fits from a bra bought at Victoria's Secret, Target or Walmart - or any American brand for that matter. Sometimes...even Freya falls short on their own quality. Perhaps their QC team is made up of a bunch of monkeys, or 5 year olds, or disgruntled sweatshop workers...or all of the above? I don't know. But if I'm paying $60+ for a piece of underwear that has a tag loaded with those wretched QC stickers that leave residue to prove they've been inspected then I expect something decent.
That being said...last year I ordered the last of Freya's "original" shaped Deco bra: Deco Honey Plunge in Jade. (Currently they are making them all with an overstarched trim that only fits women with short, narrow roots which was their only target audience with all of their other bras. The original Deco design does not have trim.) Upon receiving it in the mail I noticed one of the cups was badly deformed. Having to avoid shipping it back and waiting close to a month I kept it and figured maybe it'd work itself out. Not only that but I ordered a larger cup size because my others were getting small. Then I lost weight. Then I gained the weight back so now I can wear it again. I had it on yesterday and Luke noticed the flaw, "If I can notice it then it must be bad!". Yes, thank you!
I searched online for a fix. The most popular result, and pretty much the only one, was to iron it with a cloth to protect the fabric. I actually tried that when I first got this but it only lasts through 1 wear, and eventually the cup refolds.
Why does this happen? A couple of reasons:
- Shoddy workmanship!
a) The main fabric has not been cut correctly, usually because it's too short for the foam so it has to stretch over the top of the foam cup and this causes it to pull the moulding out and down. - or
b) When stitching the main fabric to the moulding, either one of them could have been pulled too much in the process resulting in the fabric being stretched and the thread in the stitches actually keeps this shape. - The bra is old and has stretched out - except this would most likely happen equally to some degree in both cups.
- The bra has been man-handled in the wash, and/or put in the dryer. Don't put them in the washing machine, unless you're careful. (See my update below) And always line dry them letting them hang from the center gore so neither the straps nor band can get stretched out in the drying process.
So why did it happen to mine? Reason 1a. There is a super quick and easy fix for this that involves chalk, thread, a thin needle, and a pair of scissors. Below are photos, pretty self explanatory but I'll briefly describe them as needed.

Yuck!
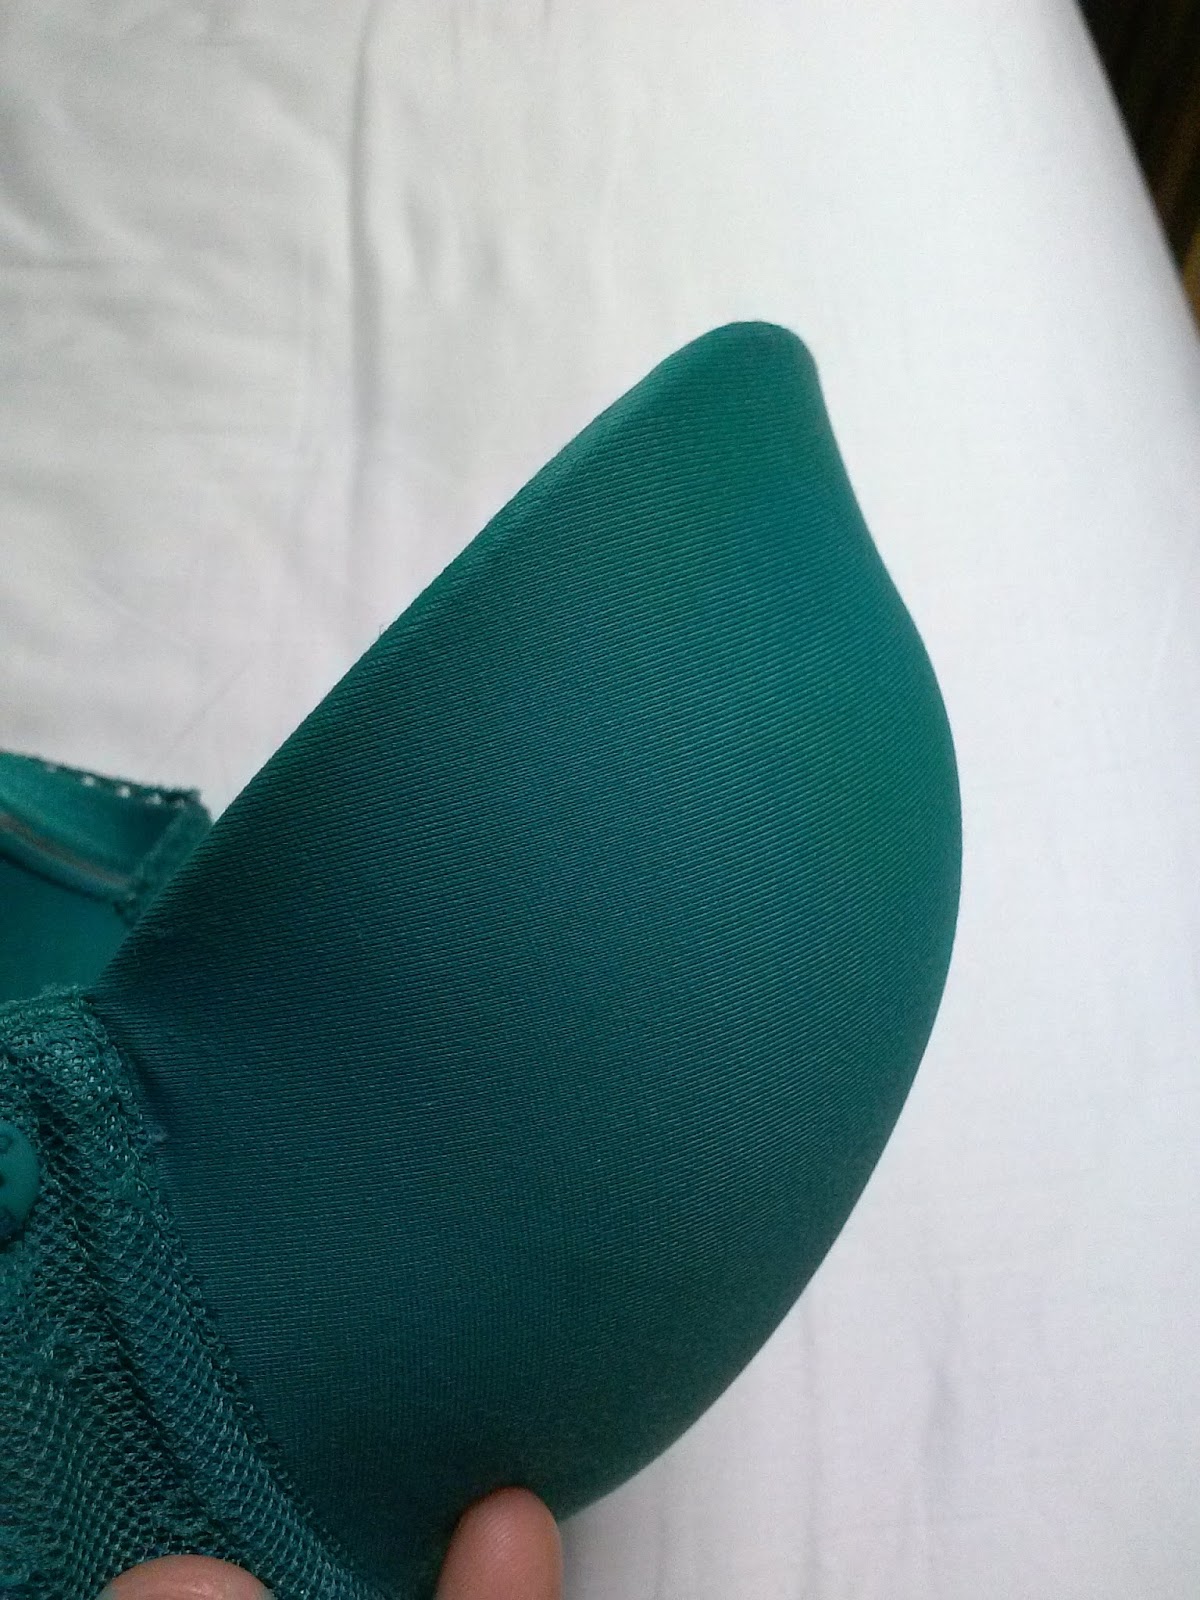
I paid $60 for this nonsense...

Shame on you, Freya!

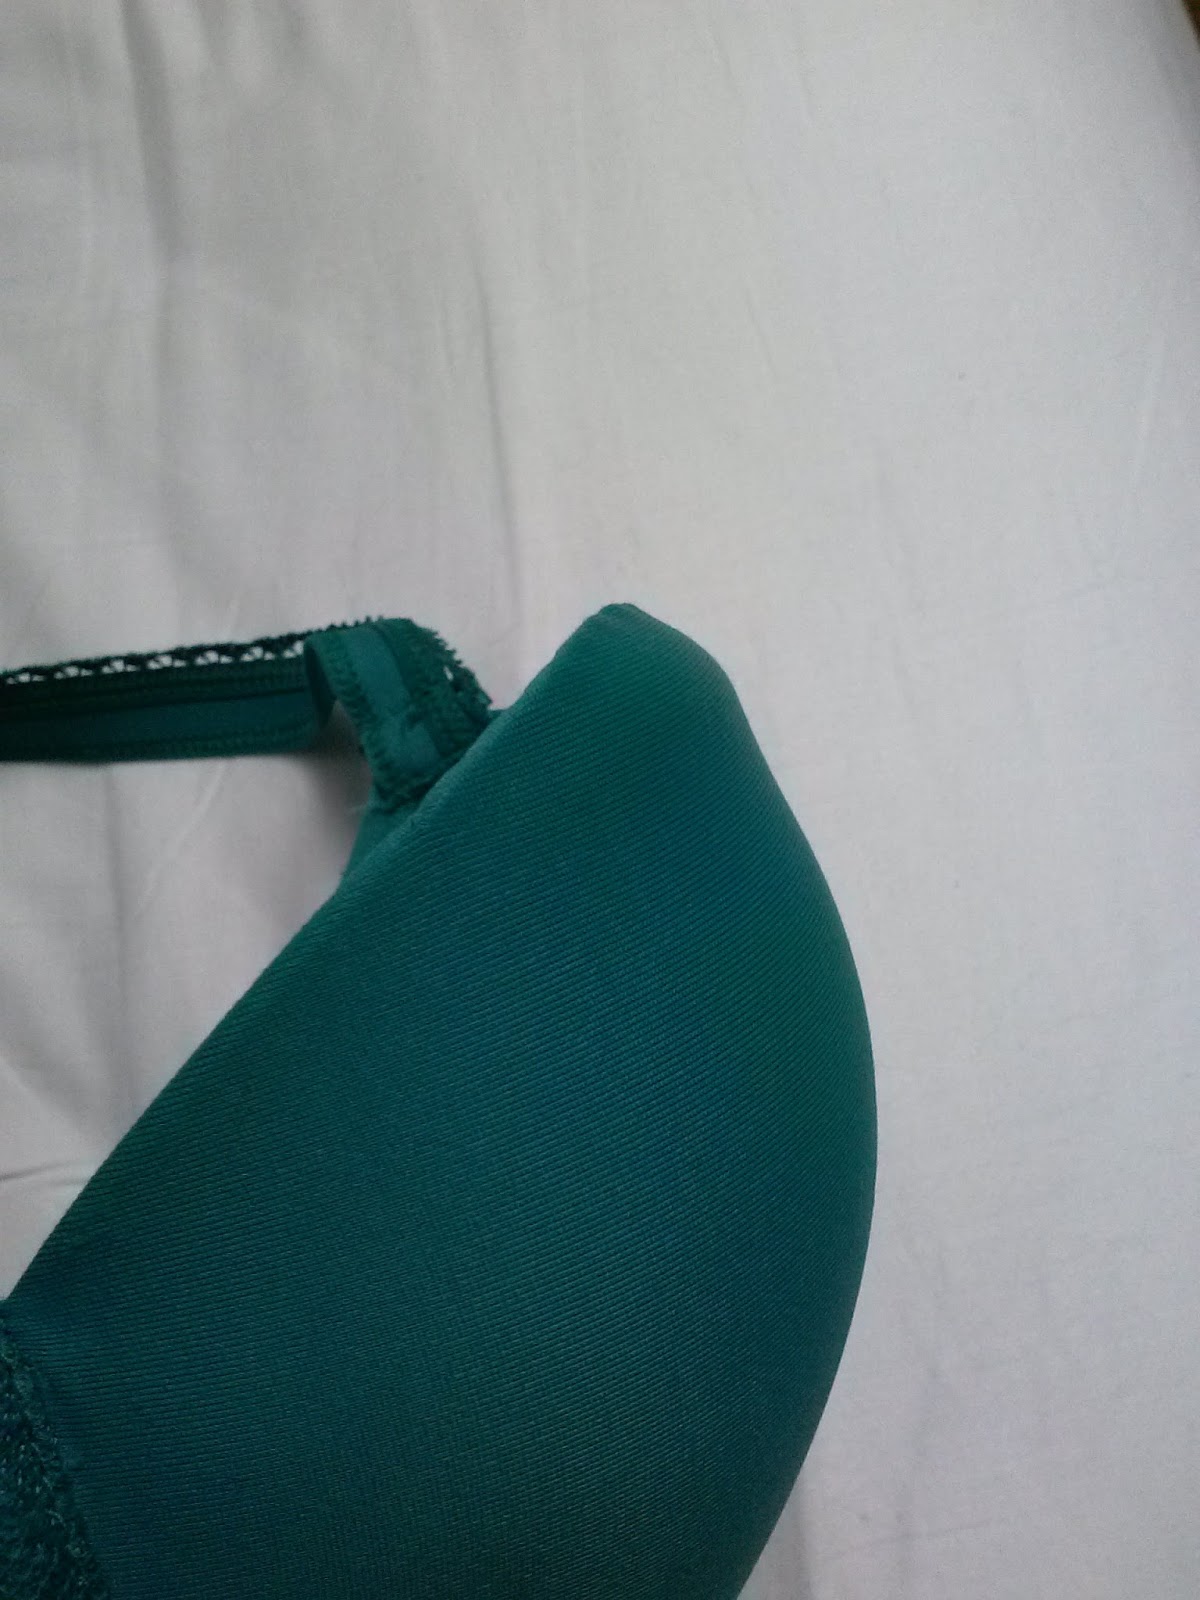
Unsightly edges under clothes.

Cup appears too big because of the curl.

On the inside of the bra, mark the bottom of the curl with chalk, extending toward cup edges a little ways past the majority of the curling. This line will be where you insert the needle.

Use a double strand of thread. If you want more security you may wax it first.
Beginning at the outer side of cup (strap side), insert your needle into the cup lining where you've marked it. DO NOT penetrate all the way through the foam! You may go through a little of the foam but not all the way, and definitely not through to the outside of the cup. Your second pass will be at the top of the cup. Same with this, do not go all the way through. You just want to catch a little bit of foam here. The idea is to pull the top back down. Stitches should be no more than 1cm apart.
DO NOT PULL THE THREAD TIGHT! One commenter on here said this fix did not work for their bra, and instead made it worse. If you pull the thread to tight it will create curling in the opposite direction. You only want to pull it as tight as to help the foam to lay smooth. Take your time, and check the foam after every stitch or so to make sure it's keeping a normal shape.

After completion.
Completed.

Completed. It still appears there is a bump in the two photos above but now the other way. If you're in the correct cup size this will go away while being worn.

Much better!

This is what a t-shirt bra should look like under a t-shirt.
Update 12-29-18: mine is still holding up very well, and I carefully wash all of my bras in the machine, regular cycle, cool to warm water, in lingerie bags, line dry only. I haven't had a problem with the integrity of them, and the hand sewing on this one still looks like new. I wear this bra quite often too.

This is what my stitching looks like after 4.5 years. As you can see it's still intact. The threads have stretched a little but the foam is completely smooth. This is without waxing the thread. (And yes it does still fit 😄 I keep a very consistent weight and shape.)

Nice close up to show the integrity, and also how much fabric is really being held by thread.
95 comments:
Thank you, this looks like a good fix. I have a couple new bras with this problem.
This worked perfectly, great fix :D saved an extremely pretty bra from the scrap heap. Thank you!
Thank you so much for this :D saved loads of money and frustration.
Greetings from Finland!
Thank you so much! I have been fighting this problem for years. This is a genius idea! So easy and quick. Thank you again!
What if there isnt a clear line of where the curl/bend starts
thank you thank you thank you! definitely a post that deserves more attention! lifesaver!
Thank you for posting this! I'd just bought an adorable penguin print bra from VS and didn't notice the cup curl when I tried it on. Your fix worked perfectly and now I can wear it without dreaded show through!!
It won't be an obvious line but you will see an area where it starts to look different than the rest. You can also try folding it further to exaggerate the curl to give you a good idea/starting point.
Awesome!! Glad to hear it worked out! =)
Aw thanks! =) And you're very welcome!
I have been struggling with a way to fix the dreaded "curl" for so long! I cant count how many bras I have had to pitch because nothing worked. I tried this and I cant believe how well it worked!! Its amazing, thank you so much for the tip! No more money down the drain on bras that decide to curl :) You are such a life saver
Worked like a charm! Thank you !
Uhmmmm...Am I the only one who cant see the pictures...?!?!?
is there anyway to get the pictures back?
Yes please bring back the pictures! I need to know how this works!
Yes please bring back the pictures! I also need to know how this works!
I can't believe I just read this truckload of intro to scroll to the actual tutorial with broken image links.
Please bring back the pictures
Yes, I need them please!!
Me too. Please!
Hi, Same as everyone else.
Your blog seems to be the only thing online with an answer and loads of other sites are linking to it, so if you could fix the photos that would be great!, all my bras (I have like 2 drawers full!) have got this problem!
Pictures are still missing :/
Pics are back.
Pics are back.
Pics are back.
Pics are back.
Pics are back.
I see the pictures but don't get what to do
What's the chalk for? Is all you do, is sew it so it's pulling back?
Hello, I see the pictures however I don't see the description of really what to do. Please help :/
Thank you for all your hard work on this post! You have saved me a few humdred$. Short story: gained weight, had to buy all new bras, and I always hand wash and hang them to dry. And they ALL started curling! Store wouldn't take them back. Said I caused damage. So THANK YOU!
Awesome fix!!! Thank you!
Struggling with finding the "line," but have noticed a definite improvement. Thank you for your post!
Struggling with finding the "line," but have noticed a definite improvement. Thank you for your post!
It looks like a great fix! Thanks so much :) I'll definately try this
It looks like a great fix! Thanks so much :) I'll definately try this
Just tried this with a VS bra that had this dreaded curl, and it worked like a charm! Thank you SO much for posting this!
I wish I would have seen this a year ago. I had one that I loved but I gave it away.awesome hack!
I wish I would have seen this a year ago. I had one that I loved but I gave it away.awesome hack!
Awesome! Thank you for a taking the time to show us how to fix this!
Thank you so much!! I have a bra that the left cup is doing a major curl out on the left cup and I think it might be a bit of a challenge to fix it even with this method!
Still WAY better then having to throw a perfectly good bra away!!
THANK YOU!! 😀
Ahh thank you! This is genius. I am definitely going to try this.
Your sewing pictures are super helpful as they are. :)
This actually didn't help me that much. The sewing left a huge lining lip around the edges. So it doesn't curl out, great, but it's so obviously forced to curl in, you can still see a definite lining (just not as sharp) of the bra...like a freaking speed bump. Lol. In the end, after a few wears anyways, because I refused to throw them out... the edges close to the cleavage curled right back out. Useless. I just have to buy new bras. I've never even had bras curl before, this is the first with damn Target bras. Bottom line, just buy GOOD bras. Spend. Dx
Wow, I thought I was the only one with not panty lines, but bra lines showing thru! Haha My bra that did this is from Victorias Secret which Im not sure why its done this since I always hand wash all my bras for this kind of reason. Ive tried ironing them flat, pulling on the fabric, bending it back, ugh!!! Will try this and let ya know! I agree, bras are expensive and I expect mine to make my figure more flattering, to keep my boobs from eventual(hopefully) sagging to my knees and that it outlive me. I know, I know, how can I ever expect a bra to keep my boobs from sagging to my knees?! LoL
Wow, I thought I was the only one with not panty lines, but bra lines showing thru! Haha My bra that did this is from Victorias Secret which Im not sure why its done this since I always hand wash all my bras for this kind of reason. Ive tried ironing them flat, pulling on the fabric, bending it back, ugh!!! Will try this and let ya know! I agree, bras are expensive and I expect mine to make my figure more flattering, to keep my boobs from eventual(hopefully) sagging to my knees and that it outlive me. I know, I know, how can I ever expect a bra to keep my boobs from sagging to my knees?! LoL
This technique is saving my bras!! Thanks so much!!
thank you!!!
Nice to read your blog! to get more information visit our website
@ http://www.mingleweave.com/avoid-bra-sleeping/
Where exactly are u cutting?
You can also iron the bra cup back to shape.
Omg, thank u!!!! This works perfectly. Ironing doesn't work...this is a great fix.
Why can't I see the description of the work you did ? just photos ?
Wow! I never would have thought of this! Thank you very much for taking the time to share with us all, even if took awhile. I will definitely be using this hack next time.
Are u sewing the mold of the cup to the top of the seam of the bra?
Thank you so much. Have a bra that fits perfectly except for this problem. Saved one!
Thank you so much for sharing this! It really works and saved my bras! 🤗
Thank you! Iam so glad I found this. I have this problem with my Lane Bryant Cacique full coverage satin bras. It is the only bra that fits right and flatters but I always have this problem. I have zigzagged stitched on the machine before and it worked but just tried it with my new bra and it curled worse. I don't know if the tension was too tight or if it was because the stitch was all the way through. I will try this your way. It seems easier that what I've done in the past. I can't believe all these bras have the same problem. I have contacted Lane Bryant in the past but they don't seem to care.
Amazing! Never would have thought of that in million years! It has happened to many of my padded bras. Makes me self conscious to see that bump under a Tshirt. I actually had a hard time figuring out the pictures but thought if so many have had success I should too. The secret is in inverting the cup and then stitching from the point where the cup is curling to the upper edge of the cup .. as if to force the curl out of the foam and straighten it. When the cup is then turn right side out VOILA!! so dent or curl. Wonderful! Hope I am right and my stitched don't come undone in the wash. I use a bra ball in the washing machine.
This is brilliant! Thought this was it for my favorite bra but with this hack it got some more time. Thank you a million! Worked like a charm.
I’m glad you attempted to write/ work on this post... however this makes no sense. Can someone PLEASE comment what you’re supposed to do below? There’s no steps?!?! Not that I don’t appreciate the author’s attempt but this post honestly doesn’t make sense and isn’t organized. Just feedback for the future. And maybe try to upgrade WiFi plans?
Still only have a phone for internet. Sorry! 🤷
Basically you want to curl the foam back in on itself by making two rows of stitches that will create an anchor.
Sorry to hear it didn't work on yours. It sounds like maybe the threads were pulled too tight and created more of a bump than it should have. I had a minimal one with mine. The cups should be fitting you closely, so it could also be that perhaps they're a little looser than they should be.
The bras I wear range from $60-80. Not exactly cheap. This is something that can happen with any kind of bra. It's just that they're all made in a factory.
Thank you so much for this post! I don't have much talent with thread, but I can follow a tutorial. My stitches don't look as nice as yours, but they did the trick! Thanks again, and I'm happy I was able to save my bra that was fairly new to me.
Just bought a brand new bra after two wears this is happening. Big Thanks for the tip. Im to in love with this bra to have to give it up.
This is harder than it looks! But it works. :)
For ladies whose breasts are fuller on the bottom (like me), I recommend actually stitching in another section of the bra first. Start around the strap area and sew down toward the band, basically covering the area where the cup meets your underarm. (Sideboob zone!) If the top of your bra is curling out, this part is probably curling out too. By fixing it first, your breasts will be pushed toward the center properly and fill out your bra. Then you can figure out exactly how tight to make the stitches along the top of the cup so it doesn't "over-curl."
Thanks so much for this tutorial! With warm weather coming it will be nice to wear my bras without those irritating curl lines. :D
I want to thank you very much for your instructions!!!
Thanks, in the infromation your article hi...
I am is likes your article..hi...
BH / Bra wanita Sorex tanpa kawat tanpa busa berpori - Sorex 02004
Bra BH Sorex 11104 Pakaian dalam Wanita Berkualitas Terbaik Masa Kini
Bh 65003 Tanpa kawat Sport Bra sorex kancing dua casual comfort
BH sorex 3262 | Bra sorex busa dan KAWAT | BH sorex kawat
Jual BH SOREX 11115 Bra Wanita | Bahan Kualitas Terbaik
I know this post was old but I still wanted to thank you for the tips! Saved my newish bra! I am so glad! You are the best
Is there a video? This looks great.
I wish i would've seen this years ago, before i threw out my bras when they did this. I Judy assumed it was from age so i figured it was time to move on and into the garbage they went. Well, i recently bought like 5 bras and 1 of them is curling. I figured is try to find an alternative to the trash. So, thank you!
OMG thank you, after I read this a few hours ago and started following your instructions immediately, approximately 120$ worth of bras saved so far, I thought I'd have to throw them away but not now, amazing!
Tiffany, 2019 - 😁
Genius! ALL my bras have this problem, and now i live in South America and can't find decent bras, so I'm going to sew them! MUCHAS GRACIAS, AMIGA!
Thank you for posting this! I also have to buy $60-$80 bras, and finding a t-shirt bra in my size is a feat in and of itself. I was so sad when I noticed the curl on my newest one! I'm currently unpicking my failed zigzag stitch to try this method.
This is awesome! Totally works! Thank you, you saved me from throwing out some expensive ones.
This was an amazing method, saved some great bras I was given by a family member. Thank you so much!!
Lifesaver! My favourite bra curled and I've never had one fit so well from Kohl's. Now I don't have to let it die 😊
Thank you so much for this trick. I haven't tried it yet, but seems like it will work from the comments.
Thank you so much. Due to pandemic had to buy v cheap bras, which did fit well but then major curl! With this hack it’s solved the problem!! Great stuff and so simple.
Thanks! This is so great! I have a Freya Deco bra too and I've been so annoyed when my nude bra started curling suddenly but my black bra has always been perfect! This fixed the problem and I'll use it in other bras too if need be! :)
Thank you!!!! Can’t wait to try this! You just saved me tossing 3 of my fav bras.
I know this article is nearly archaic now, but I wanted to tell you how grateful I am for this! The absolute devastation and frustration when the curling shows under a fitted shirt. All my bras did this, and this fix works AMAZINGLY! Thank you thank you
PS - my bras were in the trash before I found your article with tears in my eyes as I was yelling at my husband how he will never understand the struggles that women consistently face. 😂
So glad I found this blog post after lots of searching for answers! Years later and still the best (only?) genuinely helpful step-by-step personal tutorial to fix a common problem! More people need to know about this! Saving your page for future reference. Worked great and totally saved my bras! Thanks a million!
you are awesome!this fixed my expensive Marks and Spencers bra.
Thank you so much for this 💗
You're wonderful and I hope your pillow is always cold!!!!! I hate lumpy bra lines and this method saved me from chronic annoyance 🥰
This method saved my $70 Wacoal strapless bra! I have minimal sewing skills (basically buttons, lol), but I was able to follow your method and get the same results as your pictures, all in 10 minutes. Thank you so much!!
I am certain my boobs each being a different size (34DD and 34DDD) is definitely a contributing factor. and i need to adjust straps to cross back for narrow shoulders which also doesnt help or at least makes things more obvious. and oh my god looking at these comments VS seems to be the common theme amongst us rip
That was really helpful. Thank you soo muchhhh.
I have zero sewing skills, patience, and lack dexterity. I love that this information is here; thank you for saving many a curled bra from being added to clothing pollution. I'm going to be sharing this with someone who has agreed to help me rescue the only bras I've ever had this hideous curl happen to. (I bought two of the same bra, they were cute & sturdy looking.... Again, only bras I've had a curl happen to. All of my other bras, never had this nonsense. Ugh) these were $40 each. I can't just throw them away. Never got the memo that bras shouldn't be washed with other clothes. ALL of my other bras, they got washed and dried with my clothes... Never got a curl until now. Again, thank you so much.
Omg I am so glad I found this this just saved my bras this was actually posted on my birthday 12 years ago and im just now finding it. I just tried it on one of my bras and it worked!! Thank you for posting this, if you didn’t I would have had to throw it away and by another one :)
12 years after posting and your efforts are still saving $, bras, and our no- show silhouettes. I'm about to go try this now! Thank you!
Post a Comment